Lash Full Set Step By Step For Beginners
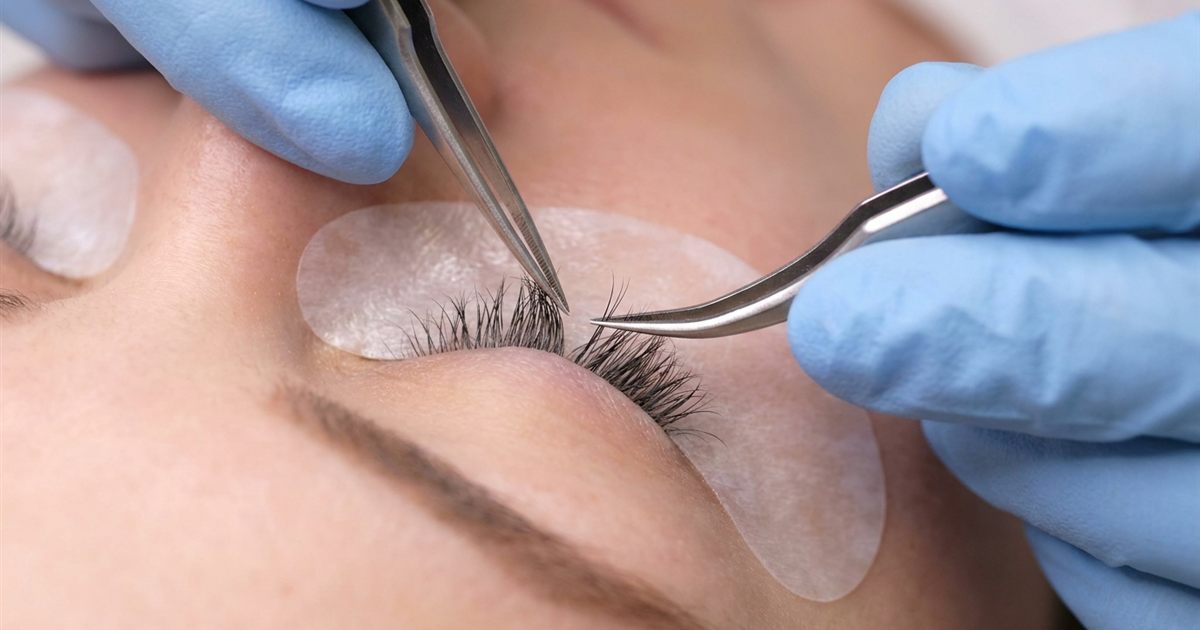
A full set of lash extensions looks effortless when a professional does it. Her hands move calmly, the client rests with closed eyes and, a couple of hours later, a full new set of lashes appears. For a beginner, the same process can feel like a blur of tiny tools and split second decisions. The good news is that a full set is not magic. It is a sequence of clear steps, and once you know the order, each step becomes much less intimidating. This guide walks through a classic full set from the first conversation to the last instruction, so you can see how the pieces fit together and know what to look for in an eyelash extension course.
Free Guide
Get Your Free Lash Extensions Starter Guide
A $17 value, yours free today. We'll send the guide straight to your inbox in the next minute.
You'll also get occasional lash tips by email. Unsubscribe anytime.
What Is A Full Set?
A full set means applying extensions to most of a client’s natural lashes, usually one extension per natural lash in a classic set, or handmade fans in hybrid and volume work. It differs from a refill, which is a later appointment that replaces extensions that have grown out or fallen off. Lash refill appointments explained covers that second type of visit. Here we focus on the very first application, which is the one that teaches you the most.
Step 1: Consultation
Before you touch the client, you talk to her. You ask what look she wants, check her natural lashes, ask about allergies, sensitivities and any recent eye problems, and explain what to expect. This conversation protects both of you. It sets expectations, uncovers safety concerns and helps you choose the right length, curl and style. What to ask in a lash client consultation gives you a practical list of questions.
Step 2: Prepare The Space And Yourself
Wash your hands, set up your cart with clean tools and make sure the client is lying comfortably. A comfortable client stays still, and a still client makes your work easier. A tidy setup helps too, as a lash cart setup guide explains.
Step 3: Prepare The Natural Lashes
Natural lashes need to be clean and free of oil, makeup and residue so the adhesive can bond properly. You cleanse the lashes and may use a primer, depending on your training and products. This preparation is one of the biggest secrets of lasting retention. Lash prep steps before extensions explains each part in detail.
Step 4: Protect The Under Eye Area
Next, you place pads or tape under the eyes to cover the lower lashes and protect the skin. The goal is to keep the lower lashes out of the way and to make sure nothing sticks where it should not. Clean, flat placement matters, because loose pads can let lower lashes slip into your work area.
Step 5: Map The Set
Mapping is your plan for which length and curl goes where. Different eye shapes suit different maps, so this step turns the consultation into a design. Shorter lengths often go toward the inner corner and longer ones toward the outer edge, but the exact map depends on the client’s eyes and the look she wants. Lash mapping for every eye shape shows how to think about it.
Step 6: Isolate One Natural Lash
Isolation is the heart of the work. With one tweezer, you separate a single natural lash from its neighbors so the extension attaches to only that lash. Poor isolation causes stickies, which are lashes bonded together, and that can pull on the natural lashes. Lash isolation for beginners explains why this skill is worth the most practice time.
Step 7: Pick Up And Apply The Extension
With the second tweezer, you pick up an extension from the tray, dip its base in a tiny amount of adhesive and place it on the isolated natural lash. You leave a small gap from the skin so the extension does not touch the eyelid. You hold it just long enough for the bond to set. Then you move to the next lash and repeat.
This step repeats hundreds of times in a set, which is why rhythm, steady hands and a clean workspace matter so much. How long a full set takes a beginner sets realistic expectations about pace.
Step 8: Keep Checking As You Go
While you work, you stop often to check for stickies, direction and spacing. Catching a problem early takes seconds, while fixing it at the end can take much longer. A lash brush helps you comb through and spot clumps. How to prevent stickies and clumping explains how to catch them before they happen.
Step 9: Check The Weight
Extensions add weight to natural lashes, and heavier is not better. A set that is too heavy can stress the natural lash and cause damage. A good artist chooses a thickness that suits the natural lash instead of the biggest look possible. Lash extension weight and natural lash health goes deeper on this essential safety idea.
Step 10: Finish, Remove The Pads And Brush
When the set is complete, you remove the pads carefully, brush through the lashes and let the client open her eyes slowly. A mirror lets her see the result, and you can check for any lashes that need adjustment while her eyes are open.
Step 11: Give Aftercare Instructions
The appointment is not finished until the client knows how to care for her new lashes. You explain how to keep them dry for the first period recommended by the adhesive maker, how to clean them and what to avoid. Good aftercare protects your work and builds trust. Lash aftercare instructions for clients gives you a ready framework.
How To Practice The Steps Without A Client
You do not need a client to learn the order. Use a mannequin head and rehearse the steps one at a time.
- Week one: practice only preparation, pads and isolation.
- Week two: add pick up and placement.
- Week three: practice a complete sequence, in order, without rushing.
- Week four: repeat full sequences while timing yourself loosely.
A mannequin head practice guide shows you how to make this practice count. And if you want a schedule to follow, a 30 day study plan for an online lash course lays out one.
Common Beginner Mistakes In A Full Set
- Skipping the consultation: you miss allergies and misread what the client wants.
- Rushing preparation: weak retention is often a preparation problem.
- Isolating poorly: this is the main cause of stickies.
- Using too much adhesive: it clumps and adds stress to the natural lash.
- Forgetting to check often: small issues become big ones by the end.
- Skipping aftercare: clients lose lashes early and blame you.
Where The Lash Extensions Master Course Fits
The course includes a full set step by step application lesson in Module 3, along with consultation, application and refills, so you can watch each stage in order before you practice it. The Lash Extensions Master Course is a one time payment with lifetime access to 31 video lessons across six modules, plus a 90 plus page training manual, a Certificate of Completion and a 7 day money back guarantee. You can stream it on any device, pause and rewatch any lesson, and you are never required to buy anything extra to follow along. See the full lesson list on the course page.
Final Thoughts
A full set is a sequence you can learn: consult, prepare, protect, map, isolate, apply, check, finish and teach aftercare. When you know the order, each step becomes easier to practice and easier to master. Take your time with the early steps, because they decide how the rest of the set turns out.
Free Guide
Get Your Free Lash Extensions Starter Guide
A $17 value, yours free today. We'll send the guide straight to your inbox in the next minute.
You'll also get occasional lash tips by email. Unsubscribe anytime.
Frequently Asked Questions
A full set follows a clear order: consultation, preparation, eye pad placement, mapping, isolation, application, checking the set, removing the pads and giving aftercare instructions.
Keep Reading
Popular Lash Training Guides
- Minimum Age For Eyelash Extension Training
- Eyelash Extension Training Cost In 2026: Real Breakdown
- Lash Tech License Requirements By State
- Is It Hard To Learn Eyelash Extensions? Honest Answer
Ready to go from reading to doing? See the full Lash Extensions Master Course or browse all lash training guides.