Lash Tape And Under Eye Pads For Beginners
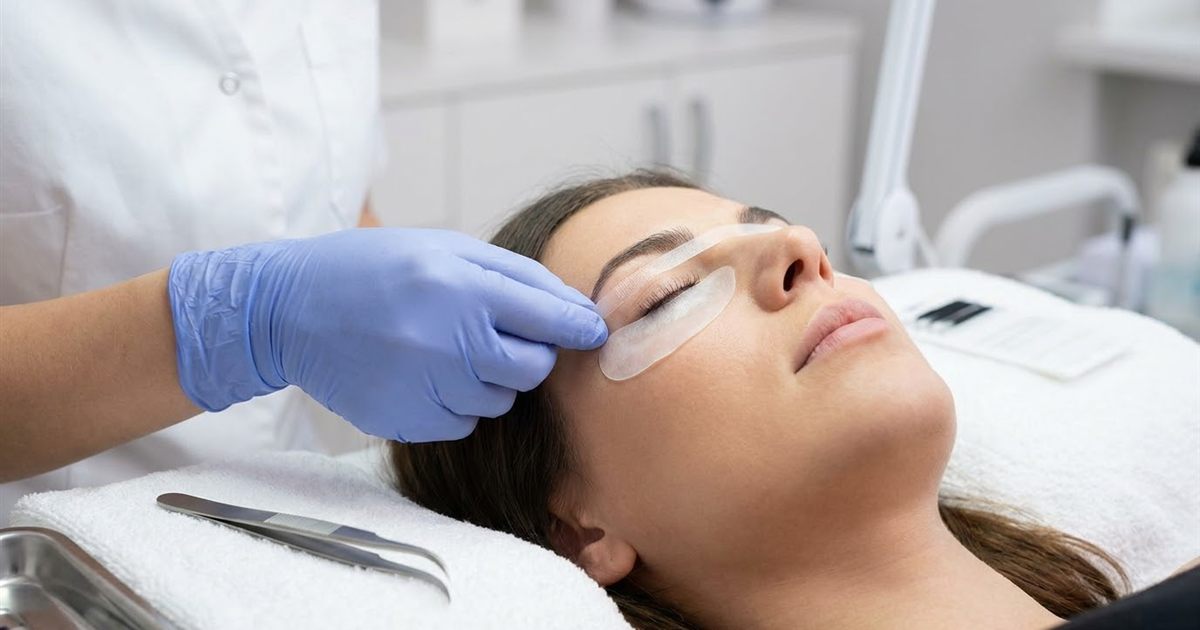
Open any lash artist’s cart and you will find a small collection of items that seem too simple to matter: a roll of tape, a pack of under eye pads, maybe a few strips of something else. Beginners often treat them as an afterthought and then wonder why isolation feels impossible, why the lower lashes keep sticking in the way, or why a client’s eyes look red after the appointment. Tape and under eye pads do real work. They protect the skin, keep lashes out of your way and help the client stay comfortable for a long session. This guide explains what each one does, how the common types differ and how to choose and use them while you build skills in a lash extension course.
Free Guide
Get Your Free Lash Extensions Starter Guide
A $17 value, yours free today. We'll send the guide straight to your inbox in the next minute.
You'll also get occasional lash tips by email. Unsubscribe anytime.
What Tape And Under Eye Pads Actually Do
Think of these items as the stage crew of a lash appointment. You rarely notice them when they work, and you notice them immediately when they do not.
- Under eye pads sit on the lower lid area and cover the lower lashes so they cannot touch the extensions or the adhesive. They also create a clean barrier between the product and the skin.
- Lash tape is used to lift and secure the upper eyelid or to hold stray lashes out of the working area. It keeps the lid still and gives you a clear view of the lash line.
- A combination of both gives you a controlled, tidy workspace so you can focus on isolating one natural lash at a time. If isolation is your current struggle, read lash isolation technique for beginners alongside this guide.
Good setup reduces the chance of lashes sticking together, which is one of the most common beginner problems. It also makes the session more comfortable for the client, because a well placed pad prevents pulling and keeps the eye area from feeling messy or damp.
The Most Common Types Of Under Eye Pads
Pads come in a few styles, and each has trade offs. The exact products vary by brand, so use this as a general map and always follow the manufacturer’s instructions.
Hydrogel Or Gel Pads
These are soft, curved patches that conform to the lower lid area. Many artists like them because they hold well and feel cool and smooth against the skin. They are usually single use. A beginner benefit is that they stay in place without much adjustment.
Foam Or Fabric Pads
Lightweight pads, often with a gentle adhesive edge, that are simple to place and remove. Some are lint free to reduce fibers near the eye. They can feel less slippery than gel and some artists find them easier to trim.
Paper Or Tape Based Strips
Thin strips that you place along the lower lash line. They are quick to apply and inexpensive. They need careful placement because they are narrower, and a poorly placed strip can leave a few lower lashes exposed.
Whichever you choose, pay attention to how the pad sits against the lashes. The lower lashes should be fully covered and the pad should not press into the eyeball area. If a pad looks uncomfortable, it is uncomfortable. Take it off and place it again.
The Common Types Of Lash Tape
Tape has two jobs: holding the lid and holding stray lashes. Artists often keep more than one type on hand.
Micropore Or Paper Tape
A breathable, gentle tape that is popular because it tends to be kind to skin. It is easy to tear into small pieces and generally easy to remove. Many beginners start here.
Silicone Or Gentle Skin Tape
Designed for more sensitive skin and for clients who react to stronger adhesives. It usually grips less aggressively, which can be an advantage for comfort and a disadvantage if you need a very firm hold.
Medical Style Or Stronger Tape
Holds more firmly but can pull on delicate skin. Many artists use it sparingly and not on clients with sensitive or thin skin. If you use stronger tape, apply it with a light touch and remove it slowly.
There is no single best tape. The right choice depends on the client’s skin, the lid shape and your own comfort level. That is why a good consultation matters, and why the lash client consultation step by step belongs in every beginner’s routine.
How To Place Pads And Tape Step By Step
Practice this on a mannequin head first so your hands learn the movements before a real person is involved. Here is a simple sequence that many beginners find easy to follow.
- Wash and sanitize your hands, and prepare the area. Your training should show you the exact standard to follow, and sanitation and hygiene in lash training explains why it matters.
- Ask the client to close their eyes and relax their face. A tense forehead changes how the lid behaves.
- Place the under eye pad just under the lower lash line, tucking every lower lash behind it. Check from the side to make sure none are poking out.
- Smooth the pad gently from the inside corner outward so it lies flat and does not fold.
- Apply tape to lift the upper lid only if your technique and the client’s lid shape require it. Use a small piece and avoid pulling the lid tight.
- Check for comfort. Ask the client if anything pulls or feels tight, and adjust before you start.
- Do a final scan. Look at both eyes from the front and the side to confirm that the lower lashes are covered and the lid is relaxed.
At the end of the appointment, remove tape slowly, holding the skin down with your other hand, and discard single use items.
Choosing The Right Setup For Different Clients
Not every client needs the same combination. A few quick guidelines:
- Sensitive skin: use gentle tape, apply less of it and consider shorter strips. Review how to respond if a client reacts to lash adhesive so you know what to do if a problem appears.
- Hooded eyes or monolids: the lid may fold over the lash line, so tape placement needs extra thought. Lash training for hooded eyes and monolids covers this in depth.
- Very short or sparse lower lashes: thinner pads may sit better, but check that every lower lash is covered.
- Restless clients: a secure pad helps, but a calm explanation of what you are doing often helps more. See lash clients who blink, twitch or talk.
Common Beginner Mistakes With Tape And Pads
- Placing the pad too far from the lash line. Lower lashes slip past and stick to extensions.
- Using too much tape. A big strip pulls the lid and hurts to remove.
- Taping the lid too tight. The eye should rest naturally, not strain.
- Reusing single use items. Always use fresh pads for each client.
- Not testing tape on skin first. Ask about sensitivities during the consultation and keep an alternative ready.
- Forgetting to check comfort. A client who feels pulling will not relax, and a tense client makes your work harder.
- Setting up in a hurry. A rushed setup invites mistakes. Build a small, consistent routine.
Keeping Your Cart Organized
A tidy cart means you grab the right item without thinking. Keep pads and tape in a clean, dry container within reach of your dominant hand, and store backups of a gentler tape. Pre cut a few small tape pieces before the client arrives so you do not fumble with a roll mid appointment. If you want a complete picture of how everything should be laid out, how to set up a lash cart as a beginner walks through it.
You will also want to know what belongs in your starter inventory, which the lash course supplies kit checklist covers in full.
A Quick Pre Appointment Routine For Tape And Pads
Build a short routine you repeat before every client so nothing is forgotten.
- Pre cut your tape. Tear three or four short pieces and stick them to the edge of your cart so they are ready when you need them.
- Open fresh pads only when the client arrives. This keeps them clean and shows the client you follow hygiene standards.
- Keep a second tape option nearby. If a client reports a tingle or redness, you can switch immediately to a gentler product.
- Check skin condition at the consultation. Dry, thin or irritated skin around the eyes calls for extra care and sometimes for postponing the service.
- Write down what worked. A line in the client’s record, such as which pad and tape you used and how the skin responded, saves guesswork at the next appointment.
Small notes like these also make you look organized and professional, which supports the habits taught in lash artist professionalism for beginners.
What Our Course Teaches
The Lash Extensions Master Course includes Product Knowledge in Module 1 so you learn what each supply is for before you touch a client. Module 3 covers the lash cart setup and a full set step by step, so you see pads and tape used in a real sequence. Module 5 adds health and safety, and the course includes lifetime access, a 90 plus page training manual and a certificate of completion for a one time $97 payment with a 7 day guarantee. You can watch each lesson as many times as you need until the setup feels natural.
Final Thoughts
Tape and under eye pads may look like small details, but they shape how easily you isolate lashes and how comfortable your client feels. Learn the types, practice placement on a mannequin, keep a gentle option on your cart and always check comfort before you begin. With a steady setup routine, the rest of your technique has a much better chance to shine.
Free Guide
Get Your Free Lash Extensions Starter Guide
A $17 value, yours free today. We'll send the guide straight to your inbox in the next minute.
You'll also get occasional lash tips by email. Unsubscribe anytime.
Frequently Asked Questions
Most lash artists use both for different jobs. Pads protect the skin and hold the lower lashes out of the way, while tape lifts and holds the upper lid or stray lashes. Many beginners find the combination makes isolation much easier.
Keep Reading
Popular Lash Training Guides
- Minimum Age For Eyelash Extension Training
- Eyelash Extension Training Cost In 2026: Real Breakdown
- Lash Tech License Requirements By State
- Is It Hard To Learn Eyelash Extensions? Honest Answer
Ready to go from reading to doing? See the full Lash Extensions Master Course or browse all lash training guides.