Lash Mapping: Styling For Every Eye Shape
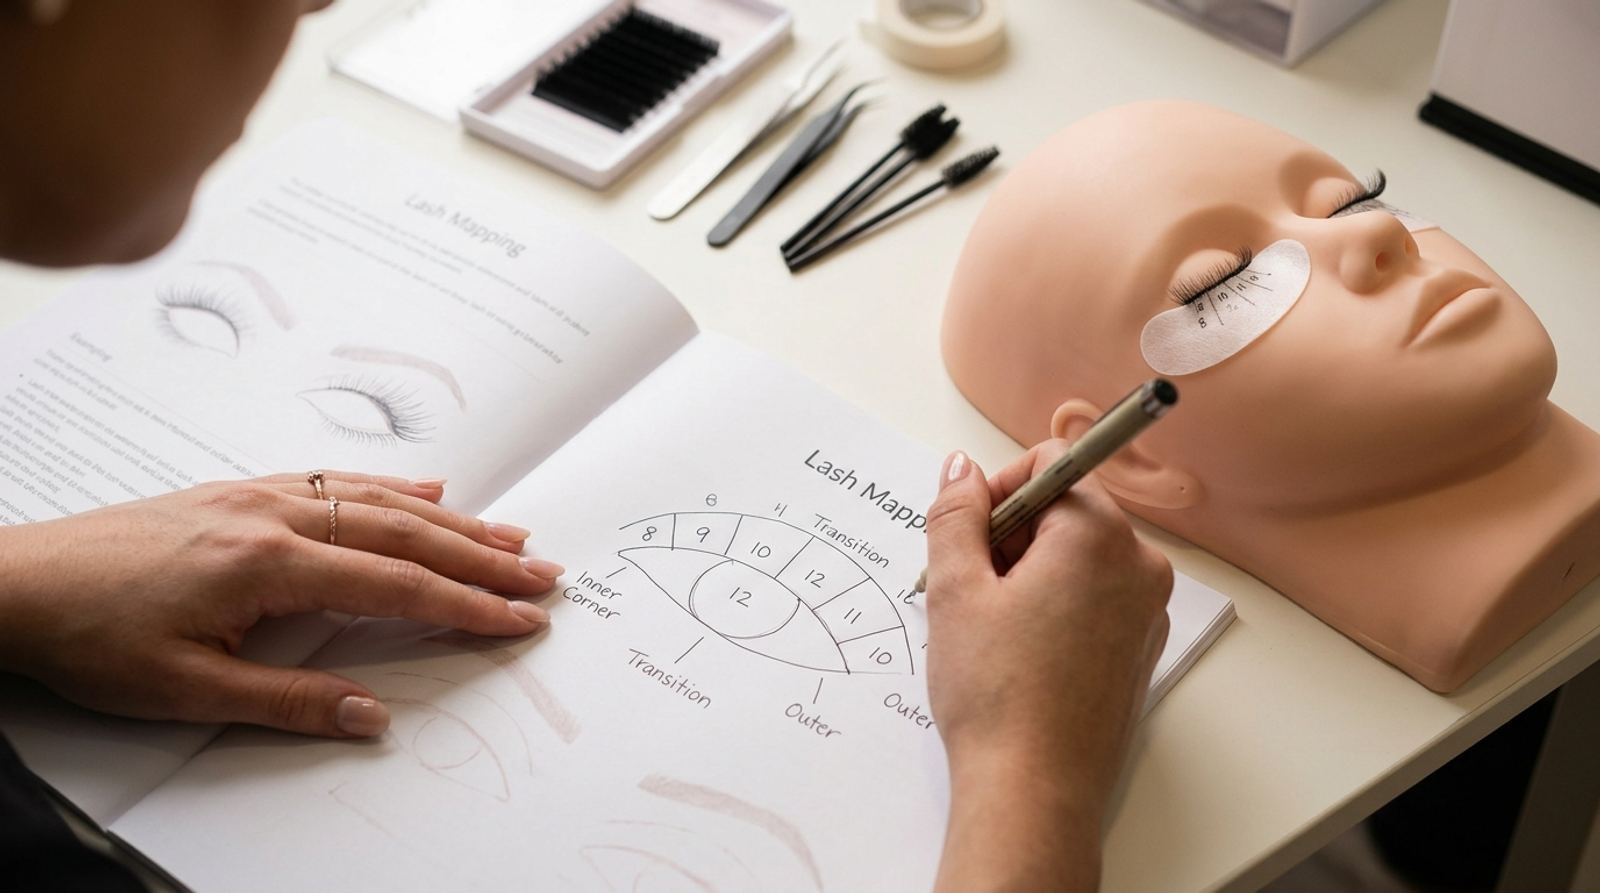
Two lash artists can apply extensions with identical isolation and identical adhesive technique, and still produce two completely different results, because one of them mapped the set with the client’s actual eye shape in mind and the other didn’t. Mapping is the part of the work that turns technically correct application into a set that genuinely flatters the person wearing it, and it’s a skill your course teaches as deliberately as isolation or adhesive control.
Free Guide
Get Your Free Lash Extensions Starter Guide
A $17 value, yours free today. We'll send the guide straight to your inbox in the next minute.
You'll also get occasional lash tips by email. Unsubscribe anytime.
What Lash Mapping Actually Means
Mapping is the plan for which lengths and curls go where along the lash line before you apply a single extension. Instead of running the same length straight across the whole eye, you vary length and curl in sections, shorter near the inner corner, building toward a peak, then tapering again toward the outer corner, with the exact pattern shifting based on the eye shape in front of you and the look the client wants. Skipping this planning step and just “eyeballing it” as you go is one of the most common reasons a technically clean set still doesn’t look quite right.
Why The Same Mapping Doesn’t Work On Every Eye
The goal of mapping isn’t to force every eye into the same shape. It’s to use length and curl placement to balance and enhance the eye shape that’s actually there.
Round eyes often benefit from a mapping that elongates rather than adds more roundness, extending length toward the outer corners instead of peaking in the center. Almond eyes have more flexibility and can usually handle a classic peak mapping without needing much correction. Hooded eyes need a mapping and curl choice that keeps the lash line visible when the eye is open, since a lash that disappears under the hood the moment the client opens their eyes defeats the purpose of the set. Monolid eyes often benefit from more curl and a mapping that opens the eye vertically, since there’s no crease to create that visual lift on its own the way there is on other shapes.
Curl Choice Is Part Of Mapping, Not A Separate Decision
Length gets most of the attention, but curl strength is doing just as much work in how a set reads on a given eye shape. A stronger curl on a hooded eye can keep lashes visible and open the eye more than length alone would. A softer curl on an eye that’s already quite open can look more natural without overdoing the lift. Your course teaches curl selection alongside length mapping specifically because treating them as two separate decisions, rather than one combined plan, is how sets end up looking mismatched even when each individual choice seemed reasonable on its own.
Practicing Mapping Before You’re Working On Real Clients
Mapping is easiest to learn by looking at reference photos of different eye shapes side by side and predicting, before checking the answer, how you’d adjust length and curl for each one. Your course’s mannequin head practice is where this becomes physical rather than theoretical: drawing your intended map on paper first, then applying to match it, builds the habit of planning before you start rather than deciding lash by lash as you go, which is a habit that’s much harder to build once you’re already working under the time pressure of a real appointment.
Reading An Eye Shape That Doesn’t Match The Textbook Example
Real clients rarely match a textbook diagram exactly. Most people have some combination of traits, a slightly hooded eye that’s also a bit round, for example, rather than a single clean category. This is exactly why understanding the logic behind each mapping principle matters more than memorizing four fixed charts: once you understand why a particular mapping choice works for a given trait, you can combine principles for an eye that doesn’t fit neatly into one box, instead of being stuck when a real client doesn’t look like your reference photos.
Mapping For The Look The Client Actually Wants
Eye shape sets the starting point, but the client’s preference should shape the final decision. A dramatic, cat-eye mapping might be technically well suited to a client’s eye shape but completely wrong for someone who specifically asked for something soft and natural for work. A quick consultation before you begin, asking directly what kind of look they’re picturing, combined with what you know about mapping for their eye shape, is how you land on a set that’s both technically sound and actually what they wanted, rather than a beautiful set that isn’t what the client asked for.
Using Reference Sheets While You’re Still Building Confidence
Many students keep a simple reference sheet during their early practice sets, a quick visual guide showing typical mapping adjustments for round, almond, hooded, and monolid eyes. This isn’t a crutch you’ll need forever, it’s a scaffold while the underlying logic is still becoming second nature. Glancing at a reference before you start a practice set, then checking your result against it afterward, builds pattern recognition faster than trying to remember everything from a single training video without ever writing your plan down. Most experienced lash artists eventually stop needing the sheet entirely, not because they memorized four rigid categories, but because the reasoning behind each adjustment became automatic through repetition.
When A Client Asks For A Specific Look By Name
Clients increasingly arrive with a reference photo or a specific term in mind, “fox eye,” “doll eye,” “natural,” pulled from social media. Part of mapping skillfully is translating what a client is asking for into an actual plan suited to their eye shape, rather than copying a reference photo exactly regardless of whether that specific mapping would look flattering on them. A fox-eye mapping that looks stunning on an almond eye in a photo might not translate well onto a rounder eye shape without real adjustment, and talking a client through that difference, while still working toward the spirit of what they wanted, is a conversation skill that goes hand in hand with the technical mapping skill itself.
Mapping Mistakes That Are Easy To Make Early On
New lash artists most commonly default to the exact same mapping on every client regardless of eye shape, simply because it’s the pattern they practiced most during training. Another common mistake is choosing a dramatic mapping because it looks impressive in a portfolio photo, without considering whether it actually suits the individual client’s eye shape or their stated preference. Both mistakes come from the same root cause, treating mapping as an afterthought rather than a deliberate decision made fresh for every single client, and both fade quickly once you’re consciously applying the eye-shape logic your course teaches rather than defaulting to habit.
What Our Course Includes
The Lash Extensions Master Course covers styling and mapping as a dedicated module, alongside eye anatomy and technique, for a one-time $97 payment with lifetime access, so you learn to plan a set before you ever apply one, not just how to isolate and apply cleanly.
Final Thoughts
Mapping is what separates a set that’s technically correct from one that actually flatters the person wearing it, and it’s worth treating as seriously as any other technical skill in your training. Learn the logic behind why each mapping choice works for a given eye shape, not just a fixed chart, and always factor in what the client actually wants before you begin. For the anatomy foundation that makes mapping decisions easier, read eye and lash anatomy before your lash course, or see classic vs volume extensions for how technique choice interacts with the mapping you’ve planned.
Free Guide
Get Your Free Lash Extensions Starter Guide
A $17 value, yours free today. We'll send the guide straight to your inbox in the next minute.
You'll also get occasional lash tips by email. Unsubscribe anytime.
Frequently Asked Questions
Lash mapping is the plan you draw out, mentally or on paper, before you ever pick up a lash: which lengths and curls go where along the lash line to create a specific look for that client's eye shape, rather than applying the same lengths straight across every set the same way.
Keep Reading
Popular Lash Training Guides
- Minimum Age For Eyelash Extension Training
- Eyelash Extension Training Cost In 2026: Real Breakdown
- Lash Tech License Requirements By State
- Is It Hard To Learn Eyelash Extensions? Honest Answer
Ready to go from reading to doing? See the full Lash Extensions Master Course or browse all lash training guides.