Lash Removal Station Setup For Beginners
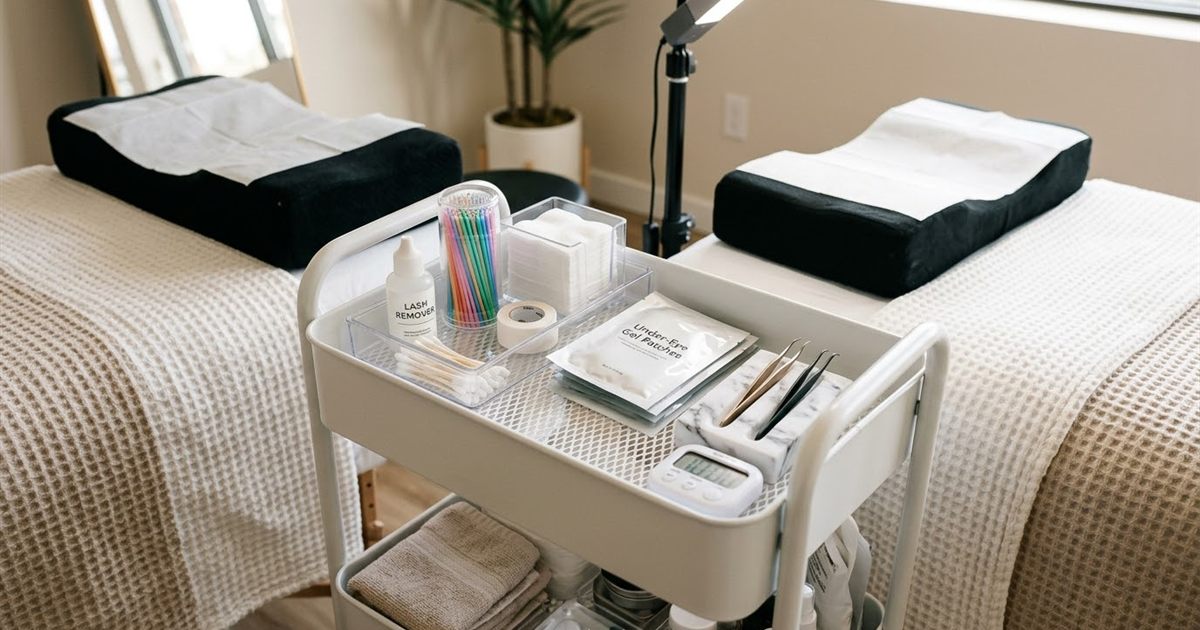
Most new lash artists spend weeks perfecting their application setup and then give almost no thought to removal. Then a client arrives wearing a set from another studio that needs to come off, or wants a break from extensions, and the artist improvises with whatever is within reach. That is how clients end up with irritated eyes, damaged natural lashes and an artist who feels stressed. A dedicated removal station fixes most of that before the appointment even begins. This guide explains how to set one up as a beginner, what to include, how to keep the client comfortable and how to keep everything clean and safe.
Free Guide
Get Your Free Lash Extensions Starter Guide

A $17 value, yours free today. We'll send the guide straight to your inbox in the next minute.
You'll also get occasional lash tips by email. Unsubscribe anytime.
Why Removal Deserves Its Own Setup
Removal is not simply application in reverse. It uses different products, different tools and a different rhythm. In application you are focused on placement and speed. In removal you are focused on protecting the skin, the eyes and the natural lashes while a product does its work. Trying to do it from an application cart means reaching around adhesive, extensions and tools you do not need, which slows you down and raises the risk of mistakes.
A clear station also makes you look and feel prepared. Clients notice when an artist knows exactly where everything is, and that confidence helps them relax with their eyes closed. If you want to understand why this skill matters so much, why safe lash removal is a skill explains what goes wrong when it is rushed.
What Goes On A Removal Station
Your exact setup will depend on the product you choose, but most stations include the same categories.
- Lash remover: a product designed for lash extension adhesive, such as a gel, cream or liquid. Different formats behave differently, so choose one you understand and read its instructions carefully.
- Application tools: micro swabs or small brushes to apply remover precisely along the lash line.
- Eye protection: under eye patches, gel pads or medical tape to protect the lower lashes and skin, plus a way to keep the upper eyelid still and comfortable.
- Isolation tweezers: for gently separating extensions once the bond has softened.
- Cotton pads and cotton swabs: for wiping away remover and residue.
- Lash cleanser or shampoo and soft brushes: to clean the natural lashes afterward.
- Disposable applicators and wipes: single use items that go straight into the trash after the appointment.
- A towel and a handheld mirror: so the client can see the result and you can keep the area clean.
- A timer: because remover should be left on only as long as the manufacturer says.
- A closed trash container: to keep used items away from clean tools.
- Aftercare information: a printed or digital sheet explaining what to expect after removal.
If you are still building your supplies, a lash course supplies kit checklist helps you decide what to buy first, and how to choose lash tweezers explains what to look for in your most important tool.
How To Arrange It
Organization matters more than the number of items. A simple layout makes each step feel natural.
- Left to right, in order of use: place items in the same order you will use them, so your hand finds each one without searching.
- Keep clean and used items separate: use a clear zone for clean tools and a separate zone, such as a tray or container, for used ones.
- Keep remover away from the client’s face until you need it: this reduces accidental contact.
- Make the working surface easy to wipe: a tray with a smooth surface or a disposable liner works well.
- Keep a copy of your steps nearby: especially while you are learning. A short checklist on the cart prevents forgetting a step.
A lash cart setup guide shows a similar logic for application, and the same principles apply here.
Prepare The Client Before You Start
A removal appointment is calmer when the client knows what to expect.
- Ask about the reason: is she changing style, taking a break or fixing a problem? The answer influences how you proceed.
- Check for irritation or discomfort: if her eyes look red, swollen or painful, stop and consider whether the service should proceed. Eye conditions that mean no lash service explains the warning signs.
- Explain the process: tell her that she will keep her eyes closed, that the remover needs time to work and that nothing should hurt.
- Mention the sensation: some people notice a cool feeling or a smell. Tell her to speak up if anything stings.
- Confirm that she has not applied oils or products near the eyes if your remover’s instructions advise it.
Your consultation form should cover this, and what to ask in a lash client consultation gives you a framework.
The Basic Flow Of A Removal
Every product has its own instructions, and you should always follow the manufacturer’s directions. In general, though, a careful removal follows a pattern like this:
- Set up the station and wash your hands.
- Position the client comfortably with her eyes closed and her head supported.
- Protect the lower lashes and the skin with pads or tape.
- Apply remover precisely along the lash line, avoiding the eye itself, and note the time.
- Wait the recommended time, while keeping the area calm and the client comfortable.
- Test one extension gently. If it releases easily, continue. If it does not, give the product more time rather than pulling.
- Remove the softened extensions gently, wiping away remover with a clean pad or swab.
- Clean the natural lashes with a lash cleanser to remove residue.
- Check the result, looking at the natural lashes and the lids, and invite the client to look at the mirror.
- Share aftercare advice and discuss when she may want a new set or a break.
The key rule runs through every step: nothing should ever be pulled or forced. Patience protects the natural lashes.
Keep It Clean And Safe
Removal involves chemicals and close contact with the eye area, so hygiene and safety are not optional.
- Use single use items once: swabs, pads and applicators go in the trash after each client.
- Disinfect reusable tools according to your sanitation standards. Lash course sanitation and hygiene standards lists the habits to follow.
- Ventilate the room and avoid unnecessary exposure for you and your client.
- Keep remover bottles closed and stored as the label says.
- Watch for sensitivity: if the client reports burning or irritation, stop, remove the product gently and follow your reaction protocol. What to do if a client has an allergic reaction explains the steps.
Plan Enough Time
Removal looks quick from the outside, but it is easy to underestimate. The time depends on how many extensions the client has, the type of bond and how comfortable you are. As a beginner, schedule generously and time yourself on practice models so that you learn your real numbers. Lash appointment time blocks for beginners explains how to turn those numbers into a schedule.
You may also want to decide how you will price removals, including removals of sets applied elsewhere. How to price lash services after a course can help you build a fair structure.
Common Beginner Mistakes
- Improvising the setup in the middle of the appointment: forgotten items cause delays and stress.
- Rushing the remover: cutting the waiting time leads to pulling.
- Letting remover touch the eye: careful placement and good protection prevent it.
- Reusing disposable items: a hygiene problem.
- Skipping the aftercare talk: clients need to know how to care for natural lashes afterward.
- Not practicing removal: like application, it improves with repetition on a mannequin.
A Quick Removal Station Checklist
- Remover chosen and instructions read.
- Swabs, pads, tape and protective items ready.
- Isolation tweezers clean and within reach.
- Lash cleanser and brushes prepared.
- Timer, towel and mirror in place.
- Closed trash container ready.
- Aftercare information available.
- Consultation and consent complete.
What Our Course Includes
The Lash Extensions Master Course teaches removal as a real skill. Module 5 includes Lash Removal Cart Setup and Removal Step By Step, alongside Health and Safety, and Module 4 covers Removals as well. The course is a one time $97 payment with lifetime access to 31 video lessons across six modules, plus a 90 plus page training manual, a Certificate of Completion and a 7 day money back guarantee. You can pause and rewatch any lesson on any device while you set up your own station.
Final Thoughts
A good removal starts before the client sits down. Build a dedicated station, arrange it in order, keep clean and used items apart, protect the client’s skin and eyes and give the remover the time it needs. With a prepared setup and a calm routine, removal becomes one of the services that earns the most trust.
Free Guide
Get Your Free Lash Extensions Starter Guide
A $17 value, yours free today. We'll send the guide straight to your inbox in the next minute.
You'll also get occasional lash tips by email. Unsubscribe anytime.
Frequently Asked Questions
It is a good idea. Removal uses different products and tools than a full set, so a dedicated, organized station keeps the appointment safe, clean and calm. The Lash Extensions Master Course teaches this in Module 5, in a lesson called Lash Removal Cart Setup.
Keep Reading
Popular Lash Training Guides
- Minimum Age For Eyelash Extension Training
- Eyelash Extension Training Cost In 2026: Real Breakdown
- Lash Tech License Requirements By State
- Is It Hard To Learn Eyelash Extensions? Honest Answer
Ready to go from reading to doing? See the full Lash Extensions Master Course or browse all lash training guides.