Lash Course Mannequin Head Practice Guide
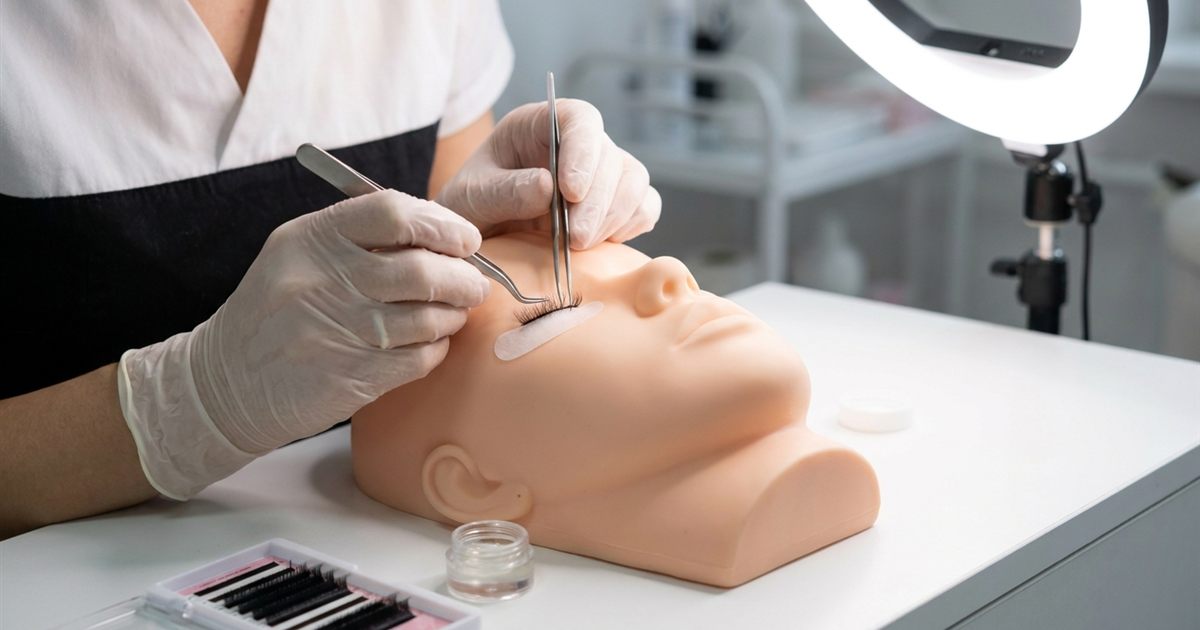
Ask any lash artist how they got their start and many will tell you the same thing: a mannequin head, a lot of patience and more failed attempts than they like to admit. A mannequin head is the safest place to make mistakes, and it is where most of your technique is built. This lash course mannequin head practice guide shows you how to set up, which drills to repeat, what to look for in your own work and when you are truly ready to move to a live model.
Free Guide
Get Your Free Lash Extensions Starter Guide
A $17 value, yours free today. We'll send the guide straight to your inbox in the next minute.
You'll also get occasional lash tips by email. Unsubscribe anytime.
Mistakes on a mannequin cost you a few lashes. Mistakes on a client can cost her comfort and her trust. Practice until the basics feel automatic.
Why The Mannequin Head Comes First
When you apply extensions to a real person, you are working near the eye on a face that blinks, shifts and talks. That is not the place to discover how your tweezers behave. A mannequin head removes the risk, so you can concentrate only on your hands. You can repeat the same motion fifty times in a row, undo a bad placement and try again with no one uncomfortable.
It also gives you a fair view of your progress. Because the setup never changes, improvement is easy to notice: cleaner isolation, straighter placement, more even spacing. Most training programs are built on this idea, which is why mannequin practice usually appears early in the curriculum. In the Lash Extensions Master Course, for example, classic work on a mannequin head is its own lesson in the fourth module, after you have learned the consultation, application steps and adhesives.
What You Need To Set Up
You do not need a big kit to start. A simple setup is enough.
- A mannequin head with replaceable lash strips or lashes.
- Individual extensions in a couple of common lengths and curls.
- Lash adhesive and a small surface or stone to hold a drop.
- Two tweezers: one for isolation and one for placement.
- Eye pads or tape to protect the lower lashes.
- A stable table, good light and a comfortable chair.
Lash course supplies: the kit you need goes into more depth on what to buy first, and choosing lash tweezers helps you pick tools that suit your grip.
Set Up Your Station Like A Real Appointment
Treat every session as if a client were lying in front of you. Sit at the head of the mannequin, keep your wrists relaxed and place the head at a height where you do not hunch. Wash and sanitize your hands and tools as you would for a person. This builds habits that will matter later, from posture to hygiene, and it protects your neck and shoulders, which suffer in this work. Ergonomics in eyelash extension training explains how to set up your body to avoid pain.
The Core Drills To Repeat
Short, focused drills beat long, tired sessions. Rotate through these.
- Isolation drill. Separate one natural lash from its neighbors and hold it steady with no others caught in the tweezers. Repeat until you can do it ten times in a row. Lash isolation: the skill beginners need describes the technique.
- Pick up and place drill. Take one extension, dip it correctly in adhesive and place it on an isolated natural lash at the right angle and distance from the lid.
- Spacing drill. Place extensions along a small section and check that each one sits alone with an even gap.
- Direction drill. Make sure each extension follows the direction of the natural lash and does not cross its neighbors.
- Full classic set drill. Work through a whole eye from start to finish, timing yourself and noting where you slow down.
Repeat the drills in short sessions of twenty to thirty minutes. Quality matters more than speed at this stage.
What To Check In Your Own Work
After each session, inspect your work with a critical eye. Look closely at these points.
- Stickies: two natural lashes stuck together. They are the most common beginner error. Preventing stickies and clumping shows how to avoid them.
- Crossing lashes: extensions that overlap and tangle.
- Gaps and bunching: uneven spacing along the lash line.
- Placement too close to the lid: a mistake that causes irritation on a real client.
- Too much adhesive: a bead that makes the bond heavy and messy.
Photograph your work from the same angle every time. Looking at last week’s photo next to today’s is the clearest proof of improvement.
Common Mistakes On Mannequin Heads
A few habits creep in during mannequin practice that cause problems later. The first is rushing, because there is no real client to keep waiting. Speed will come on its own with repetition. The second is ignoring adhesive, which is not as forgiving on a person as it seems on plastic. Keep your adhesive fresh and store it properly, as storing lash adhesive and its shelf life explains. The third is practicing only what is easy. If your isolation is weak, drill isolation, not the full set you already enjoy.
If your hands shake, do not be discouraged. It is very common, and there are simple ways to steady them. Shaky hands and lash training tips offers practical ideas.
Practice Removals Too
Most beginners only practice application, but removal is just as important. Learning how to dissolve the bond and slide off extensions gently, on a mannequin, gives you the feel for timing and technique before you do it on a real person. Safe lash removal: why it matters explains why this skill protects your clients’ natural lashes.
How Long Until You Are Ready For A Model
There is no magic number of hours, but you can judge readiness with a simple test. Can you isolate cleanly every time? Can you place extensions in the right direction at the right distance from the lid? Can you finish a classic set with even spacing and almost no stickies, in a time that does not tire you out? If the answer is yes to all three, you are close. If not, keep drilling. How long a full set takes for a beginner gives realistic timing, so you do not compare yourself to experts.
When you do feel ready, start with a friend or family member who is patient and willing. Finding practice models and model consent forms for lash practice explain how to do this responsibly.
Moving From Classic To Volume
Do not rush to volume. Classic on a mannequin teaches the base skills every other style depends on. Once you can place classic extensions cleanly and consistently, volume becomes much easier to learn, because you already control your isolation and your adhesive. Classic vs volume lash extensions explains how the two relate.
Where The Lash Extensions Master Course Fits
The Lash Extensions Master Course is 31 video lessons across six modules, with a 90 plus page training manual, a Certificate of Completion, lifetime access and a 7 day money back guarantee. Because the lessons are on video, you can pause, rewind and watch a step while your mannequin head sits in front of you, then repeat it until it feels natural. The classic mannequin head lesson, the volume full set and the hybrid refill lessons are all there to practice along with. See the whole lesson list on the course page.
Final Thoughts
The mannequin head is where lash artists are made. Set up your station like a real appointment, drill the core skills in short sessions, check your own work honestly and practice removals as well as application. Move to a live model only when your isolation, placement and spacing are steady. Slow, careful practice now will make you faster, safer and more confident later.
Free Guide
Get Your Free Lash Extensions Starter Guide
A $17 value, yours free today. We'll send the guide straight to your inbox in the next minute.
You'll also get occasional lash tips by email. Unsubscribe anytime.
Frequently Asked Questions
A mannequin head is strongly recommended. It lets you repeat isolation and placement as many times as you like without the discomfort or risk of working on a real eye, and most training is designed around mannequin practice first.
Keep Reading
Popular Lash Training Guides
- Minimum Age For Eyelash Extension Training
- Eyelash Extension Training Cost In 2026: Real Breakdown
- Lash Tech License Requirements By State
- Is It Hard To Learn Eyelash Extensions? Honest Answer
Ready to go from reading to doing? See the full Lash Extensions Master Course or browse all lash training guides.