How To Set Up A Lash Cart As A Beginner
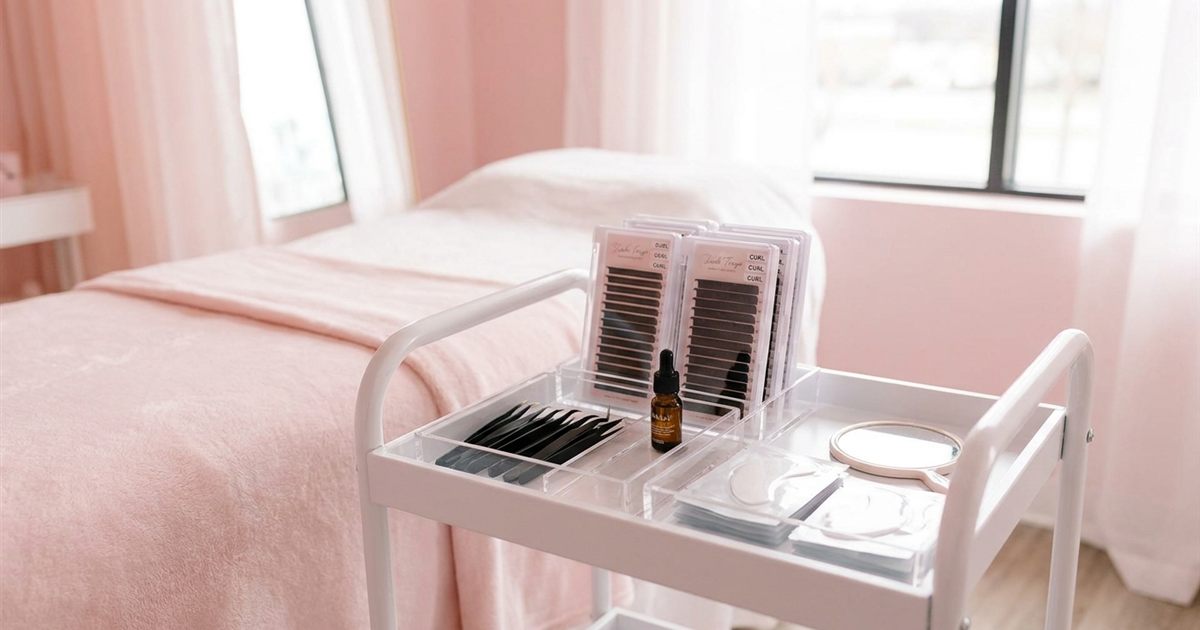
When you picture a lash artist at work, you probably see the lashes, the tweezers and the calm hands. What you do not see is the small table beside her: the lash cart. It looks like a simple piece of furniture, but a messy cart quietly ruins sets. Adhesive dries while you search for a tweezer, a used tool ends up next to a clean one, and a one hour practice session turns into a stressful scramble. Learning how to set up a lash cart early is one of the easiest ways to make everything else in your lash extension course feel smoother. This guide walks you through what goes on the cart, how to arrange it and how to adjust it for removals.
Free Guide
Get Your Free Lash Extensions Starter Guide
A $17 value, yours free today. We'll send the guide straight to your inbox in the next minute.
You'll also get occasional lash tips by email. Unsubscribe anytime.
Why The Cart Setup Matters More Than You Think
A lash cart has three jobs. It keeps your tools within reach so your hands never leave the client’s eye area longer than necessary. It keeps clean and used items apart so you protect your client from cross contamination. And it keeps your posture comfortable, because a cart that is too far away makes you twist and lean for every pick up.
Beginners often treat the cart as an afterthought and focus only on technique. In reality, the way you arrange your tools affects speed, hygiene and even how steady your hands feel. That is why a good course teaches the setup as its own lesson before moving on to full sets. Lash course sanitation and hygiene standards explains how much of a safe appointment depends on organization like this.
What Goes On A Beginner Lash Cart
You do not need a huge collection to start. A lean, well chosen setup is easier to keep clean and easier to learn on. A practical beginner cart holds:
- Adhesive: the product that bonds the extension to the natural lash, kept with its cap and a place to set a small drop while you work.
- Isolation tweezers: the pair that separates one natural lash from its neighbors.
- Pick up tweezers: the pair that holds and places the extension or fan.
- Lash trays: the extensions you will use for the set, arranged by length and curl.
- Eye pads or tape: to protect the under eye lashes and the skin.
- Primer and cleanser: to prepare the natural lashes before the first extension.
- Microbrushes and cotton swabs: for small cleaning and adjustments.
- A lash brush: to comb through the lashes and check for stickies.
- A mirror: to check the set from the client’s point of view.
- Disinfectant and wipes: to clean tools and surfaces between clients.
- A small trash cup: so used items never pile up on your work surface.
If you are still deciding what to buy, a lash course supplies kit checklist breaks down the essentials from the nice to haves, and how to choose lash tweezers helps with the most personal tool on the cart.
How To Arrange The Cart
The best arrangement is the one that lets you work without thinking. A few simple rules get you there.
- Dominant hand first: put the tools you grab most, tweezers and adhesive, on the side of your dominant hand.
- Clean on one side, used on the other: designate a side for clean items and a side for used ones, and never cross them.
- Group by purpose: keep prep items together, application items together and cleanup items together.
- Keep the surface clear: only place what you will use in this set. Extra items create clutter and risk.
- Make it reachable without twisting: you should be able to pick up each tool without turning your back or shoulders.
When you practice on a mannequin head, you can test this arrangement without any pressure. A mannequin head practice guide shows how to use that practice time to build habits that carry over to real clients.
Setting Up For A Full Set
A full set is where a good setup pays off most. Before you start, lay out your cart in the order you will use things. First comes preparation: pads, primer and cleanser. Then the application tools: isolation tweezers, pick up tweezers, the tray and the adhesive. Last comes the finishing items: the lash brush and the mirror.
Have your lash tray prepared with the lengths and curls you plan to use, and place a small amount of adhesive only when you are ready to apply. Adhesive does not wait around, and fresh adhesive gives you more reliable retention. How to fix poor lash retention explains why small habits like this affect how long your sets last.
Setting Up A Separate Removal Cart
Removals use a different set of tools, and it helps to treat them as their own setup. A removal cart usually holds:
- A remover product
- Microbrushes or small applicators
- Eye pads to protect the skin
- Tweezers
- Wipes or damp cotton to clear the residue
- A trash cup for used materials
Keeping this setup separate from your application cart reduces the chance of mixing products and keeps each procedure calm and clear. Removal is a skill that deserves its own preparation, and why safe lash removal matters explains how much of a lash artist’s reputation depends on doing it well.
Keeping The Cart Clean Between Clients
A tidy cart is only as good as the routine behind it. After each client, remove and discard all single use items, wipe down the surface and disinfect your tweezers according to the guidelines of your area. Restock only after the cart is clean, not before. A reset routine of just a few minutes keeps every client appointment starting from the same safe point.
Make this routine a habit during your training, not something you add later. The more you practice resetting the cart, the less you will have to think about it when real clients are in the chair.
Ergonomics: Set The Cart Up For Your Body
Your cart is part of your posture. Place it at a height and distance that lets your elbows stay close to your body and your wrists stay neutral. If you are right handed, the cart goes on your right. If you are left handed, flip the whole arrangement. Eyelash extension training ergonomics covers how small changes in setup protect your neck, back and hands over a long day of work. If you are left handed, left handed lash extension training has tips for mirroring your setup.
Mistakes Beginners Make With Their Cart
- Too many items: a crowded cart slows you down and hides clutter.
- Mixing clean and used tools: a small slip that matters a lot for hygiene.
- Putting adhesive out too early: it can start to thicken before you apply it.
- Placing the cart too far away: you end up leaning and tiring faster.
- Skipping the reset: starting with leftovers from the last client invites mistakes.
A Simple Practice Routine
Before you work on a client, practice the setup the same way every time for a week. Lay out the cart, run through a pretend set with the mannequin, then reset it completely. The goal is not speed, it is rhythm. When your hands know where everything lives, you can focus on the client and the lashes instead of searching for tools. Over time you will adjust the layout to your own style, and that is exactly how every working lash artist develops a cart that feels like hers.
Where The Lash Extensions Master Course Fits
The course includes setup as part of the training, with a lash cart setup lesson in Module 3 and a lash removal cart setup lesson in Module 5, so you see the arrangement before and during your practice. The Lash Extensions Master Course is a one time payment with lifetime access to 31 video lessons across six modules, plus a 90 plus page training manual, a Certificate of Completion and a 7 day money back guarantee. You can stream it on any device, pause and rewatch any lesson, and you are never required to buy anything extra to follow along. See the full lesson list on the course page.
Final Thoughts
A good lash cart is simple, organized and clean. Keep only what you need, put your most used tools on the side of your dominant hand, separate clean from used and give removals their own setup. These habits are easy to build during your eyelash extension training and they pay off in every set you do afterward.
Free Guide
Get Your Free Lash Extensions Starter Guide
A $17 value, yours free today. We'll send the guide straight to your inbox in the next minute.
You'll also get occasional lash tips by email. Unsubscribe anytime.
Frequently Asked Questions
A beginner cart holds your adhesive, isolation and pick up tweezers, lash trays, eye pads or tape, a primer and cleanser, microbrushes, a mirror, disinfectant and a trash cup. Keep only what you use in each set within easy reach.
Keep Reading
Popular Lash Training Guides
- Minimum Age For Eyelash Extension Training
- Eyelash Extension Training Cost In 2026: Real Breakdown
- Lash Tech License Requirements By State
- Is It Hard To Learn Eyelash Extensions? Honest Answer
Ready to go from reading to doing? See the full Lash Extensions Master Course or browse all lash training guides.