Lash Tweezer Grip And Hand Position Tips
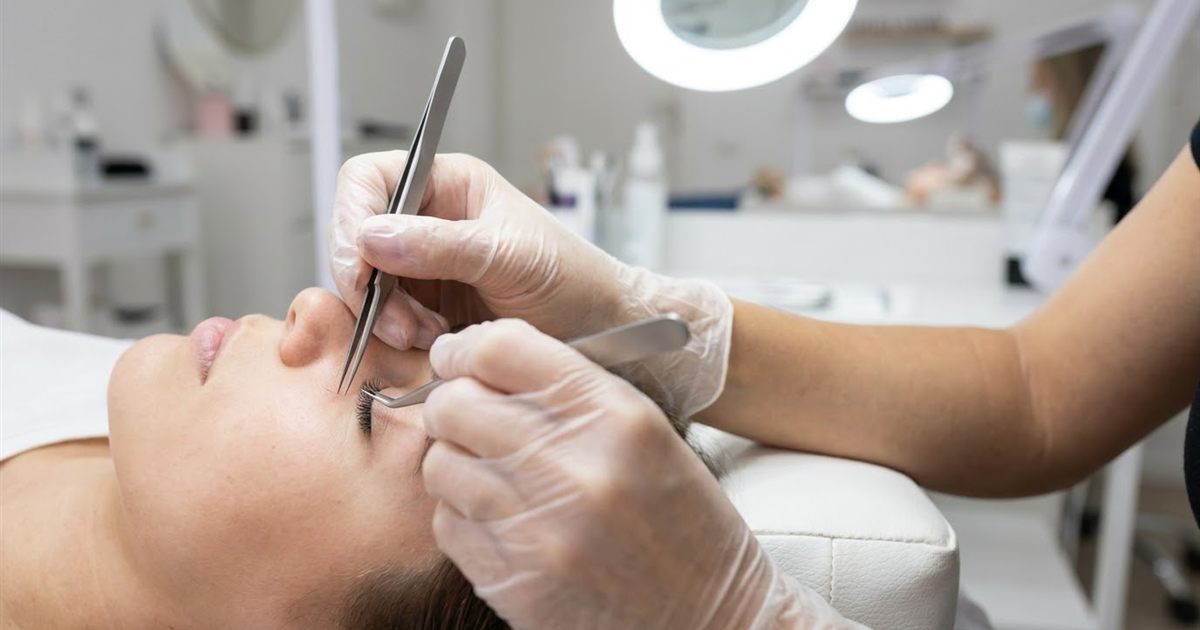
Ask a room of beginners what they find hardest about lash extensions and many will say the same thing: controlling the tweezers. Fingers cramp, wrists ache and extensions land in the wrong place or stick to a neighbor. Often the culprit is not talent or steadiness, it is grip and hand position. Holding the tweezers too tightly, supporting your arms poorly or bending your wrist at an awkward angle all make fine motor control harder than it needs to be. This guide explains how to hold lash tweezers, how to position your hands and arms, and how to practice so that your movements become steady and relaxed, whatever your lash extension course schedule looks like.
Free Guide
Get Your Free Lash Extensions Starter Guide
A $17 value, yours free today. We'll send the guide straight to your inbox in the next minute.
You'll also get occasional lash tips by email. Unsubscribe anytime.
Why Grip And Position Matter
Lash work asks for tiny, precise movements held for a long time. Every extra bit of tension in your hand travels to the tips of the tweezers. A tight grip amplifies tremor, a bent wrist tires the tendons and a floating elbow gives your hand nothing to stabilize against.
Good technique reduces fatigue, improves accuracy and protects your body over a long career. It also makes isolation easier, which is the foundation of clean sets. Lash isolation: the skill beginners need pairs naturally with this guide.
Know Your Two Roles
Most lash artists use two sets of tweezers at the same time, each with a different job.
- Isolation tweezers: used to separate one natural lash from the rest and hold it steady. They are usually held in the non dominant hand for many artists, though some work differently.
- Placement tweezers: used to pick up the extension and attach it to the isolated natural lash.
Because the tasks differ, the grip differs too. Isolation needs a light, steady hold, while placement needs more precise control. Choosing the right tools for each job is covered in choosing lash tweezers during your course.
The Basic Grip
A common starting point is a relaxed pen style grip. Here is how to build it.
- Rest the tweezers in the web between your thumb and index finger, so the tail sits comfortably against your hand.
- Place your thumb and index finger on opposite sides of the tweezer body, a little behind the tips, so you can control opening and closing with small movements.
- Support from underneath with your middle finger, which helps steady the tweezers and lets you rotate them slightly.
- Keep the grip light. You should be able to wiggle the tweezers slightly in your fingers. If your knuckles are white, you are gripping too hard.
- Keep your fingers curved and relaxed, not rigid or straight.
Different tweezer shapes sit differently in the hand. Straight, curved and angled tips each change the best grip slightly, so follow your trainer’s guidance and adapt to what is comfortable.
Hand And Wrist Position
Keep The Wrist Neutral
A wrist bent sharply up, down or sideways strains tendons and shakes more. Aim for a straight line from forearm to hand where possible. If you cannot keep it neutral, adjust the bed, the chair or your own position rather than forcing the wrist.
Support Your Elbow
A floating elbow makes your hand work harder. Try to rest your forearms or elbows on a stable support, such as an armrest or a table beside you, so your hand moves from a steady base. Ergonomics in eyelash extension training explains setup in detail.
Anchor Without Pressing
Many artists steady their hands by lightly anchoring a finger on a stable point near the work area. Be careful not to press on the client’s face or eye area, and keep any contact light and hygienic. If you are unsure, ask your trainer which anchor points are acceptable in your training.
Use Your Fingers, Not Your Whole Arm
Small movements should come from your fingers and wrist, not from swinging your shoulder. If you notice big arm motions for tiny tasks, slow down and shrink your movements.
Setting Up Your Body
Your grip is only as steady as your posture.
- Adjust the bed height so you are not hunching or lifting your shoulders.
- Sit close enough that your arms are not stretched out.
- Keep your back supported and your feet on the floor.
- Check your lighting so you do not lean in to see. Lash lighting and magnification setup has useful tips.
- Keep your shoulders loose and take a breath before you begin.
Exercises To Build Control
You can train grip outside of client work, which saves time and builds confidence.
- Pick up and place practice. Use a mannequin head or strip and place extensions slowly, focusing on a light grip. A lash course mannequin head practice guide shows how to set it up.
- Slow motion drills. Move the tweezers in and out of position as slowly as you can, feeling for tension.
- Release drills. Hold the grip for ten seconds, then release completely. This teaches you to notice and drop tension.
- Short, frequent sessions. Fifteen focused minutes a few times a day usually beat one long tiring session. How to practice lash extensions between lessons offers a routine.
- Record yourself. A short video of your hands shows posture and grip problems you cannot feel.
Troubleshooting Common Problems
Hands Shake
Loosen your grip, support your elbow, shorten your sessions and breathe slowly. Shaky hands: eyelash extension training tips covers this in depth, including when to see a professional if the shaking is not just nerves.
Fingers Cramp Or Ache
You are probably gripping too hard or holding the position too long. Take breaks, stretch gently and recheck your tweezer choice. If pain persists, consult a healthcare professional. Lash training with limited hand strength offers more ideas.
Extensions Land In The Wrong Place
This often comes from poor stability or a grip that blocks your view of the tips. Adjust your hand position so you can see the work, and slow your approach.
Tweezers Slip
Check whether the surface is clean, your hands are dry and the grip point is comfortable. Replace worn tweezers rather than fighting them.
Left Handed Challenges
Left handed artists may need to mirror setups and demonstrations. Is lash training different for lefties walks through it.
Common Beginner Mistakes
- Gripping too hard.
- Bending the wrist sharply.
- Leaving the elbow unsupported.
- Using the same grip for isolation and placement.
- Practicing for hours without breaks.
- Ignoring pain.
- Never checking posture on video.
A Quick Grip Checklist
- Light, relaxed pen style hold.
- Neutral wrist.
- Elbow or forearm supported.
- Movements from fingers and wrist.
- Shoulders relaxed.
- Short breaks scheduled.
Tweezer Care And Why It Affects Your Grip
Even a perfect grip struggles with damaged tools. Tweezers with misaligned tips, worn coating or loose spring tension force your fingers to compensate, which creates tension and fatigue. Check your tweezers before every session. The tips should meet cleanly with no gap, the spring should feel even and smooth, and the surface should be free of residue.
Clean and disinfect them according to your training and your sanitation routine, and store them with tip protectors so the points do not bend. If a pair drops on a hard floor, test it again before using it on a client. Replacing worn tools costs far less than the lost time and frustration of working with something that fights you. Many artists also keep a second set of the same model, so a damaged pair never forces a rushed substitute mid appointment.
What Our Course Teaches
The Lash Extensions Master Course includes Lash Application and Full Set Step By Step Application in Module 3, and Classic Mannequin Head practice in Module 4, so you can watch hand and tweezer positions repeatedly at your own pace. Module 5 includes Lash Artist Health, which supports comfortable technique. The course offers 31 video lessons, lifetime access, a 90 plus page manual with a homework template and a certificate of completion for a one time $97 payment with a 7 day guarantee.
Final Thoughts
Steady hands are built, not born. A light grip, a neutral wrist, a supported elbow and a relaxed body give your tweezers the stability they need. Practice in short sessions, check yourself on video and adjust your setup before you blame your talent. With good habits, clean isolation follows.
Free Guide
Get Your Free Lash Extensions Starter Guide
A $17 value, yours free today. We'll send the guide straight to your inbox in the next minute.
You'll also get occasional lash tips by email. Unsubscribe anytime.
Frequently Asked Questions
Most artists hold them lightly, similar to holding a pen, using the thumb, index and middle fingers, with a relaxed grip that allows small controlled movements. Your trainer will show the exact style that fits your tweezers.
Keep Reading
Popular Lash Training Guides
- Minimum Age For Eyelash Extension Training
- Eyelash Extension Training Cost In 2026: Real Breakdown
- Lash Tech License Requirements By State
- Is It Hard To Learn Eyelash Extensions? Honest Answer
Ready to go from reading to doing? See the full Lash Extensions Master Course or browse all lash training guides.