Lash Lighting And Magnification Setup Tips
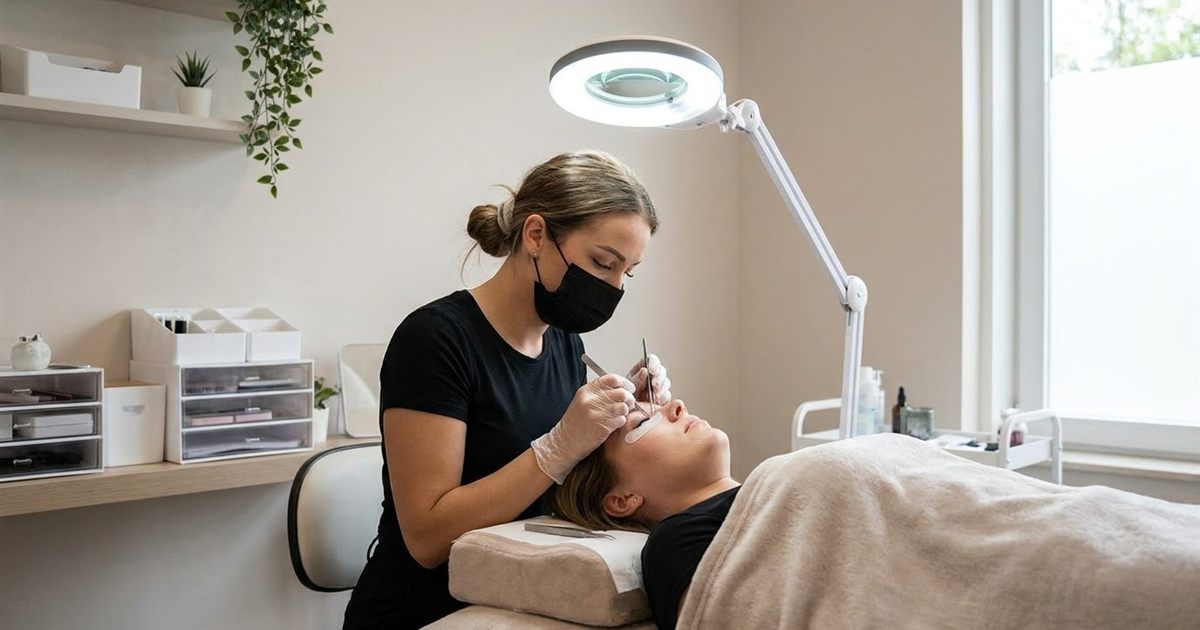
Many beginners think their shaky isolation or messy placement is a hand problem. Often it is a seeing problem. Lash extensions are tiny, you work a few inches from the eye, and a lash that looks perfectly separated in dim light can turn out to be stuck to its neighbor under a brighter lamp. Good lighting and sensible magnification do not replace skill, but they give your skill a fair chance. They also protect your eyes and neck during long appointments. This guide explains how to set up your lighting, what to look for in a magnification lamp and how to avoid the glare and strain that make sessions harder than they need to be.
Free Guide
Get Your Free Lash Extensions Starter Guide
A $17 value, yours free today. We'll send the guide straight to your inbox in the next minute.
You'll also get occasional lash tips by email. Unsubscribe anytime.
Why Lighting Is A Core Lash Skill
A full set can involve hundreds of tiny placements, each one requiring you to tell one natural lash from another. If your light is too dim, you cannot see the separation. If it is too harsh, glare bounces off the adhesive and the extensions and hides detail. If it casts shadows, your own hands block the view just when you need it most.
Poor visibility leads directly to common problems like stickies, uneven placement and fatigue. If you have been working on those, lash stickies and why they happen is a good companion read.
Lighting also affects your body. Squinting and leaning in to see better strain your eyes and neck. Over time this adds to the fatigue discussed in ergonomics in eyelash extension training.
The Three Jobs Of Your Light
A good setup does three things at once.
- Illuminate the lash line evenly, so every lash is visible without bright spots.
- Avoid shining into the client’s face, because strong light can be uncomfortable even through closed eyelids and under pads.
- Stay out of your way, so you can move your hands and tweezers freely without bumping the lamp or casting shadows.
Keep these three in mind and most placement decisions become obvious.
Choosing Your Light
There is no single perfect product, but a few qualities matter.
- Brightness you can adjust. A lamp with dimmable settings lets you find the right level for each client and each style.
- Even, diffused light. A softer, wider light usually creates fewer harsh shadows than a single narrow beam.
- Neutral color. A light that is not very yellow or very blue shows adhesive, lashes and skin closer to how they really look.
- A flexible arm or stand. You will adjust it often, so it should move easily and stay where you put it.
- A stable base or mount. A wobbly lamp wastes time and attention.
Test any lamp before buying if you can, and try it on a mannequin head in the conditions where you will really work. A lash course mannequin head practice guide explains how to set up a realistic practice area.
Magnification: Helpful, Not Mandatory
Some lamps include a magnifying lens, and some artists wear loupes or magnifying glasses. Magnification can help you see isolation clearly, particularly when you are learning, but it is a personal choice.
Benefits
- Makes it easier to confirm that each natural lash is separated.
- Helps you notice adhesive on the skin or on neighboring lashes.
- Can reduce squinting and leaning for artists who find fine detail hard to see.
Trade Offs
- Higher magnification narrows your field of view and can make it harder to judge the overall shape of the set.
- Depth perception may feel different at first, so your tweezers can seem further or closer than they are.
- A lens that is dirty or scratched hides detail rather than showing it.
A sensible approach is to begin with mild magnification or none, learn what you can see, and increase only if you need to. Step back often and look at the whole eye without magnification to judge symmetry and style. If you have concerns about your eyesight, do you need good eyesight for lash work addresses the question honestly.
Where To Place The Light
Placement changes everything. Try this method while practicing:
- Set up your chair and bed first, so your posture is right before you adjust the light.
- Position the lamp to one side of the client’s head, rather than directly overhead behind you, so your head does not block it.
- Angle it down toward the lash line, not into the face. Keep the beam centered on the working area.
- Lower the brightness to a comfortable level, then increase slowly until you can clearly see separation.
- Check for shadows by moving your hands and tweezers through the working area. If you see a shadow from your own hand, shift the lamp slightly.
- Check for glare on the adhesive drop and on the extensions. If it gleams too much, soften or tilt the light.
- Ask your client if the light feels too bright, especially at the start.
Take a minute to do this every appointment. Consistency matters more than perfection.
Room Lighting And The Background
Your lamp is not the only light in the room. Overhead lights, windows and screens all change what you see.
- Avoid strong backlighting, such as a bright window right behind the client, which makes the lash line harder to see.
- Keep the room evenly lit so your eyes are not constantly adapting between a bright lamp and a dark room.
- Reduce reflections from shiny surfaces, mirrors or glossy tables near the work area.
- Use calm, soft ambient light to help clients relax. Many lash studios keep the room slightly dimmer than the work lamp so the client feels at ease.
If you are building a home studio, setting up your home lash studio covers layout, lighting and more.
Protecting Your Eyes And Neck
Lash work is visually demanding. Small habits protect you for the long run.
- Take short breaks to look at something far away, which relaxes your focusing muscles.
- Blink and hydrate. Close focus makes people blink less, which dries the eyes.
- Check your posture. If you find yourself leaning closer and closer, your lighting or magnification may need adjusting.
- Book regular eye exams if you notice persistent strain, headaches or blurry vision.
- Pace your day. Avoiding burnout in your first year lashing explains how to schedule sensibly.
Common Beginner Mistakes With Lighting
- Working in dim light and relying on feel instead of sight.
- Setting the light too bright and getting glare off the adhesive.
- Shining the lamp into the client’s face and making them uncomfortable.
- Letting your own shadow block the lash line.
- Using too much magnification too early and losing the big picture.
- Never cleaning the lens, so smudges hide detail.
- Changing the setup mid appointment and breaking your rhythm.
A Simple Pre Appointment Lighting Check
- Clean the lamp lens and your glasses or loupes.
- Set the lamp to a medium brightness and angle it to the lash line.
- Test for shadows by moving your hands through the area.
- Ask the client if the brightness feels comfortable.
- Recheck once the first few extensions are placed.
Practice Drill: Find Your Best Light In Ten Minutes
You can learn your ideal lighting without a client in the chair. Set up a mannequin head with a few extensions already placed and one deliberately stuck pair of lashes. Turn on your lamp at the lowest setting and see whether you can spot the stuck pair. Raise the brightness one step at a time and note the point where you can see it clearly without glare. Then change the angle slightly and notice how shadows move. Finish by repeating with and without magnification.
Write down the brightness, distance and angle that worked best, and photograph your setup. Next time you work in a new room, you can recreate it in a minute. This small experiment teaches you more about your own eyes than any product description, and it connects directly to the practice routines in how to practice lash extensions between lessons.
What Our Course Teaches
The Lash Extensions Master Course treats your working environment as part of your technique. Module 3 includes lash cart setup and full set application, and Module 5 includes Lash Artist Health, so you learn to protect yourself while you work. The course has 31 video lessons you can replay, lifetime access, a 90 plus page training manual and a certificate of completion, all for a one time $97 payment with a 7 day guarantee.
Final Thoughts
You cannot isolate what you cannot see. Adjustable, even light, comfortable magnification and a thoughtful lamp position make every lash easier to separate and every session easier on your body. Practice your setup on a mannequin, keep it consistent and adjust as your skills grow. A good view is one of the quickest ways to better sets.
Free Guide
Get Your Free Lash Extensions Starter Guide
A $17 value, yours free today. We'll send the guide straight to your inbox in the next minute.
You'll also get occasional lash tips by email. Unsubscribe anytime.
Frequently Asked Questions
Not every artist uses one, but many beginners find a lamp with gentle magnification helps them see individual lashes clearly. Choose a level that feels comfortable and does not distort what you see.
Keep Reading
Popular Lash Training Guides
- Minimum Age For Eyelash Extension Training
- Eyelash Extension Training Cost In 2026: Real Breakdown
- Lash Tech License Requirements By State
- Is It Hard To Learn Eyelash Extensions? Honest Answer
Ready to go from reading to doing? See the full Lash Extensions Master Course or browse all lash training guides.